After migrating to my own on-prem server I decided I finally should implement encryption for my email server. Yes, past few months while hosted on AWS EC@ Vm it was unencrypted, but those are just my side mails anyway, my main one is secured on my Microsoft account 🙂
I was already using Let’s Encrypt certificate in my website, now I changed way that I’m getting them from command line ACME client to using Certify – more on that in another post. But there is one small problem – Certify has great tools for managing certificates and automatically deploys them to IIS, but what about hMailServer?


Even when exporting certificate using MMC.exe in Certificates snap-in – it creates only one .cert or .pfx file, depending if it contains private key too, hMailServer needs separate private and public keys files. What to Do?
Finally i found solution:
- First I got OpenSSL for Windows from here
- After running exe I executed:
pkcs12 -in "C:\<<cert path>>\cert.pfx" -out "C:\<<cert path>>\cert.pem" -passin pass:<<pfx password>> -nodes- That got me both private and public keys in one file –
cert.pem. I edited it in Notepad++, created two new empty filesprivate.pemandpublic.pem - I copied first part containing private key to
private.pemand the rest topublic.pem– that way I finally got two separate files for private and public key!
Only problem with that is that it won’t be automatically renewed – so untill I’ll find better solution I will just have to update it every two months (as I configured Certify to renew automatically each 60 days). I will find solution for that later 🙂
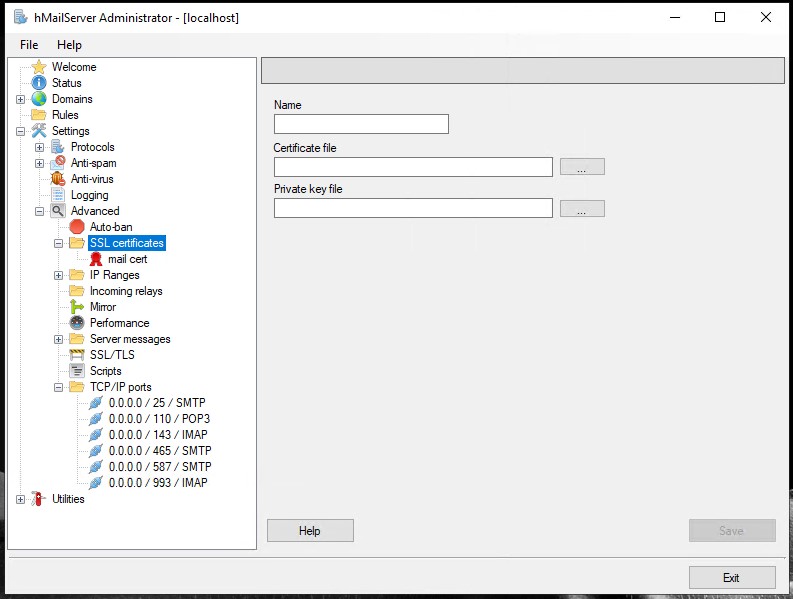
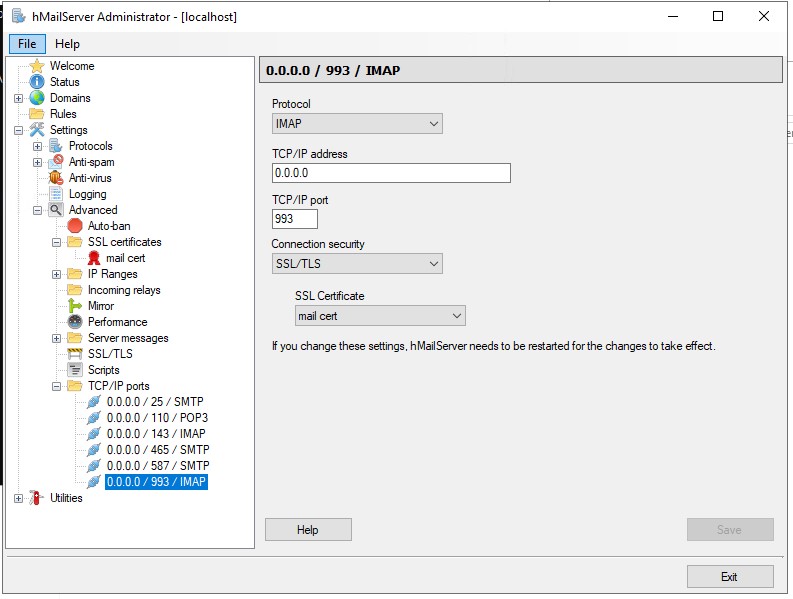
Next step was implementing it in hMailServer. In Settings->Advanced->SSL certificates I just selected Add…, pointed it to files created above, added name and that’s it. Next in Settings->Advanced->TCP/IP Ports I added two new ports – 993 for IMAP and 465 for SMTP, for each i selected appropriate protocol and port, for security selected SSL/TLS and selected certificate i added before.
Of course nothing is too easy with own server 🙂 And I couldn’t connect… I probably lost half an hour checking all the server and Outlook settings and… In the end I forgot of course about letting traffic in to server. So I also needed to add appropriate firewall rules both in Windows Defender on server and in my router but I guess that is trivial to set up – if you remember you need to!


Setting up mail client is straightforward too: Just change ports and security.
Ta-da! Now all spam emails I receive are finally encrypted 🙂